How to Build an AI Paddle Game in Unity Using Neural Networks
Here is a step-by-step guide to building a classic Ping Pong-style game from scratch in Unity 6. Because you want to use 3D shapes (a sphere and 3D rectangles) but keep a 2D gameplay feel, we will use a 3D project but set the camera to view the world in 2D (Orthographic).
Step 1: Project and Camera Setup
- Open the Unity Hub and create a new 3D Core project in Unity 6.
- In the Hierarchy, select the Main Camera.
- In the Inspector, change the Projection from Perspective to Orthographic.
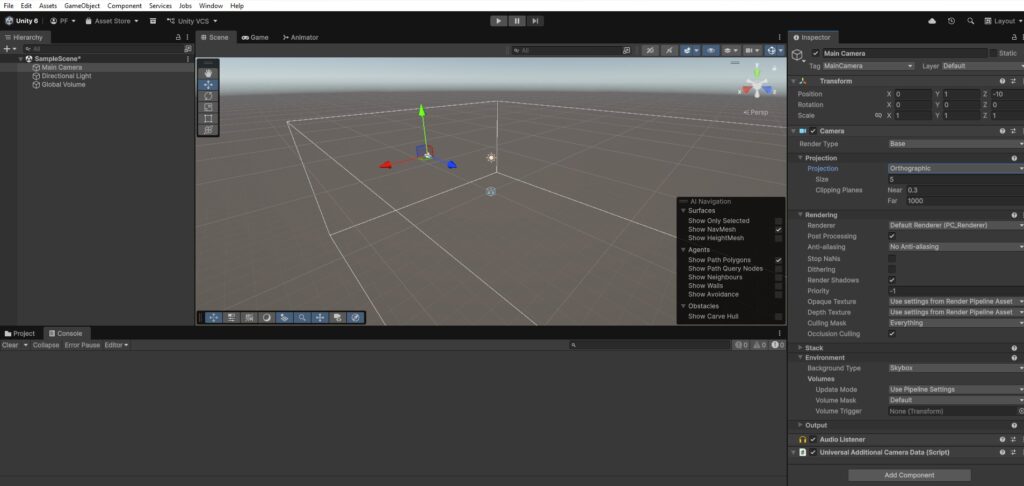
- Set the Size to
10(this controls how much of the arena is visible). - Set the Camera’s Transform Position to
X: 0, Y: 0, Z: -10and Rotation to0, 0, 0. Change the Clear Flags to Solid Color and pick a black background.
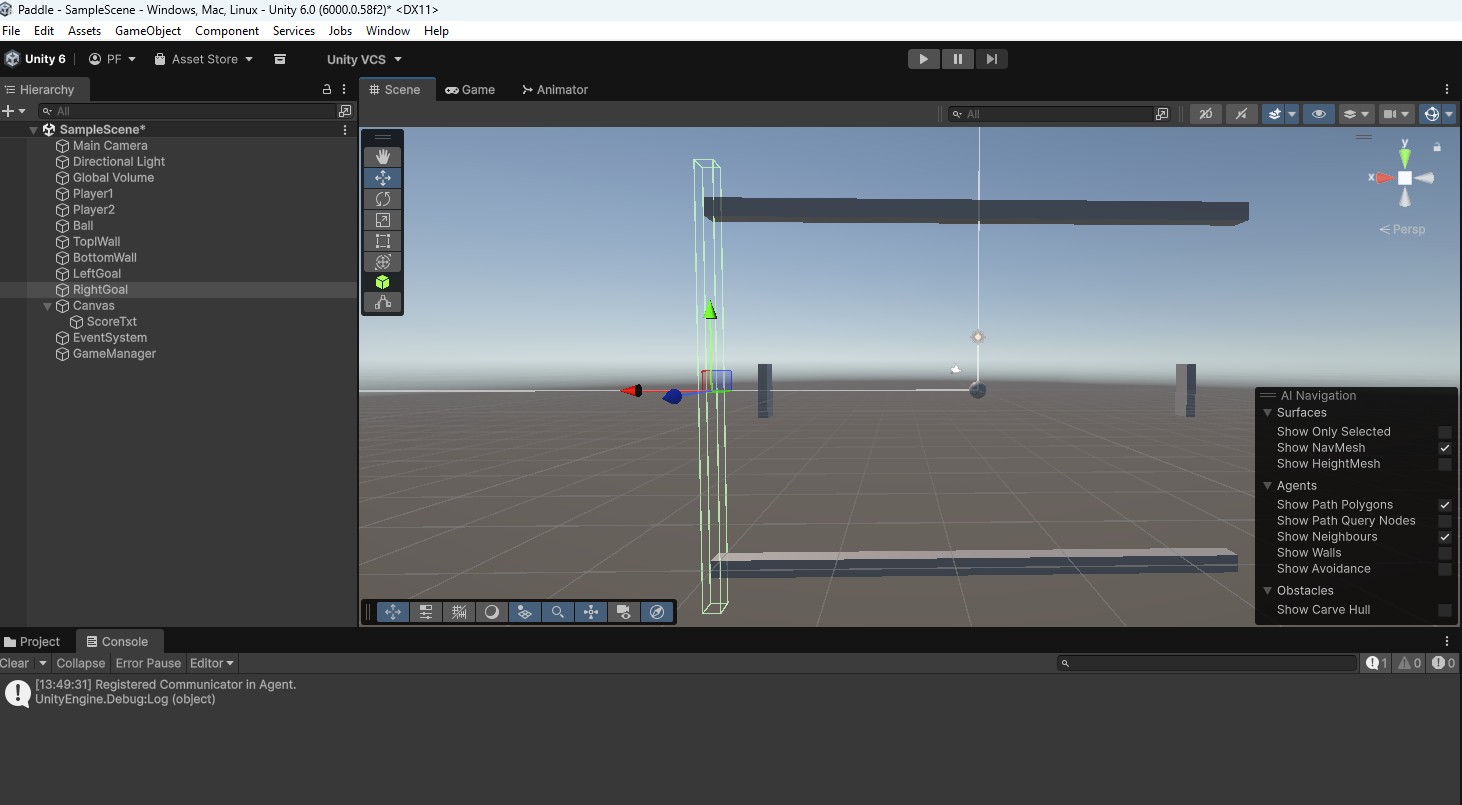
Step 2: Building the Arena and Objects
- The Paddles:
- Right-click in the Hierarchy > 3D Object > Cube. Name it
Player1. - Set its Scale to
X: 0.5, Y: 3, Z: 1(making it a 3D rectangle). - Set its Position to
X: -12, Y: 0, Z: 0. - Duplicate
Player1(Ctrl/Cmd + D), name itPlayer2, and set its position toX: 12, Y: 0, Z: 0.
- Right-click in the Hierarchy > 3D Object > Cube. Name it
- The Ball:
- Right-click the Hierarchy > 3D Object > Sphere. Name it
Ball. - Set its Position to
X: 0, Y: 0, Z: 0.
- Right-click the Hierarchy > 3D Object > Sphere. Name it
- The Walls (Boundaries):
- Create another Cube, name it
TopWall. - Set its Scale to
X: 30, Y: 1, Z: 1and Position toX: 0, Y: 10, Z: 0. - Duplicate it, name it
BottomWall, and set its Position toX: 0, Y: -10, Z: 0.
- Create another Cube, name it
Step 3: Perfecting the Physics
Classic arcade games need perfectly elastic collisions where the ball never loses speed.
- Right-click in your Project window > Create > Physic Material. Name it
Bouncy. - Select
Bouncyand set these exact values in the Inspector:- Dynamic Friction:
0 - Static Friction:
0 - Bounciness:
1 - Friction Combine:
Minimum - Bounce Combine:
Maximum
- Dynamic Friction:
- Apply this material: Select your
Player1,Player2,TopWall,BottomWall, andBallin the Hierarchy. Drag theBouncymaterial into the Material slot of their Box Collider or Sphere Collider components. - Configure the Ball’s Rigidbody:
- Select the
Balland click Add Component > Rigidbody. - Uncheck Use Gravity.
- Set Collision Detection to Continuous.
- Under Constraints, freeze Position
Z, and freeze RotationX,Y, andZ.
- Select the
Step 4: Writing the Scripts
1. The Paddle Movement Script
- In the Project window, right-click > Create > C# Script. Name it
PaddleController. - Attach this script to both
Player1andPlayer2. - Open it and paste the following code. This allows Player 1 to use W/S and Player 2 to use the Up/Down arrows.
using UnityEngine;

public class PaddleController : MonoBehaviour
{
    public float speed = 15f;
    public KeyCode moveUp;
    public KeyCode moveDown;

    // Set these in the Inspector based on where your walls are
    public float yMax = 8.5f;
    public float yMin = -8.5f;

    void Update()
    {
        if (Input.GetKey(moveUp))
        {
            transform.Translate(Vector3.up * speed * Time.deltaTime);
        }
        else if (Input.GetKey(moveDown))
        {
            transform.Translate(Vector3.down * speed * Time.deltaTime);
        }

        // Clamp the Y position so the paddle doesn't go through the walls
        Vector3 clampedPosition = transform.position;
        clampedPosition.y = Mathf.Clamp(clampedPosition.y, yMin, yMax);
        transform.position = clampedPosition;
    }
}- Setup in Inspector: Select
Player1, setMove Upto W andMove Downto S. SelectPlayer2, setMove Upto Up Arrow andMove Downto Down Arrow.
Step 2: Create “Goal” Zones
We need invisible zones behind the paddles to detect when the ball goes out of bounds.
- Right-click the Hierarchy > 3D Object > Cube. Name it
LeftGoal. - Set its Scale to
X: 1, Y: 25, Z: 1and its Position toX: -15, Y: 0, Z: 0(just behind Player 1). - In the Inspector for
LeftGoal, check the “Is Trigger” box on the Box Collider component. - Uncheck the box next to Mesh Renderer so the cube becomes invisible.
- Duplicate
LeftGoal(Ctrl/Cmd + D), name itRightGoal, and set its Position toX: 15, Y: 0, Z: 0. - Assign Tags: At the very top of the Inspector, click the Tag dropdown, select Add Tag, and create two new tags:
LeftGoalandRightGoal. Go back to your goal objects and assign these tags to them respectively.
Step 3: Build the Score UI
- Right-click the Hierarchy > UI > Text – TextMeshPro. (If a window pops up asking to Import TMP Essentials, click import).
- Name the new text object
ScoreText. - In the Canvas object that was automatically created, change the Canvas Scaler component’s UI Scale Mode to Scale With Screen Size.
- Select
ScoreText, set its text to 0 – 0, center the alignment, change the color to white, and increase the font size. Anchor it to the Top Center of the screen and adjust its position.
Step 4: The GameManager Script
We need a central manager to handle the score math and update the UI.
- Right-click in the Hierarchy > Create Empty. Name it
GameManager. - Create a new C# script called
GameManagerand attach it to this empty object. - Paste the following code:
using UnityEngine;
using TMPro; // Needed for UI text

public class GameManager : MonoBehaviour
{
    public int player1Score = 0;
    public int player2Score = 0;
    public TextMeshProUGUI scoreText;
    public BallController ball;

    public void AddScore(int playerID)
    {
        if (playerID == 1)
        {
            player1Score++;
        }
        else if (playerID == 2)
        {
            player2Score++;
        }

        // Update the UI
        scoreText.text = player1Score + " - " + player2Score;

        // Reset the ball after a point is scored
        ball.ResetBall();
    }
}
Step 5: Update the Ball to Detect Goals
Finally, we need to tell the ball what happens when it touches the invisible triggers and how to reset itself. Open your Ball, then add a component Script BallController and paste it:
using UnityEngine;

public class BallController : MonoBehaviour
{
    public float initialSpeed = 10f;
    private Rigidbody rb;
    public GameManager gameManager; // We will link this in the Inspector

    void Start()
    {
        rb = GetComponent<Rigidbody>();
        LaunchBall();
    }

    void LaunchBall()
    {
        float x = Random.Range(0, 2) == 0 ? -1 : 1;
        float y = Random.Range(0, 2) == 0 ? -1 : 1;
        rb.linearVelocity = new Vector3(x * initialSpeed, y * initialSpeed, 0f);
    }

    public void ResetBall()
    {
        // Stop the ball and move it back to the center
        rb.linearVelocity = Vector3.zero;
        transform.position = Vector3.zero;

        // Launch again after 1 second
        Invoke(nameof(LaunchBall), 1f);
    }

    // This detects when the ball hits our invisible goal zones
    void OnTriggerEnter(Collider other)
    {
        if (other.CompareTag("LeftGoal"))
        {
            gameManager.AddScore(2); // Player 2 gets a point
        }
        else if (other.CompareTag("RightGoal"))
        {
            gameManager.AddScore(1); // Player 1 gets a point
        }
    }
}
Final Link-up: Go back to Unity. Select your GameManager object in the Hierarchy. In the Inspector, drag your ScoreText into the Score Text slot, and drag your Ball into the Ball slot. Then, select your Ball object and drag it into the ball’s Game Manager slot.
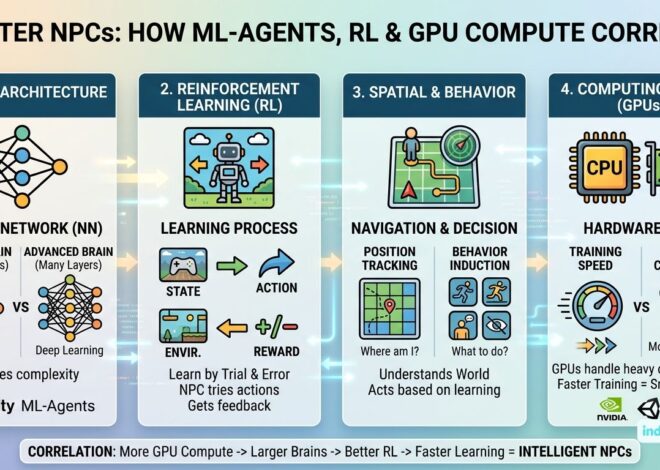
Here is the complete step-by-step guide to transforming your Pong-style paddle into an intelligent, self-playing AI using Unity ML-Agents
Phase 1: Python and Miniconda Environment Setup
ML-Agents requires a Python environment to run the machine learning backend (PyTorch) that communicates with Unity.
- Install Miniconda: Download and install Miniconda for your operating system.
- Create the Virtual Environment: Open your Anaconda Prompt (or terminal) and create a dedicated environment by running:
conda create -n mlagents python=3.10.12Activate the Environment:
conda activate mlagentsInstall PyTorch and ML-Agents: Install the required Python packages inside this environment:
mlagents 1.1.0 (version)
pip install torch==2.1.1 torchvision==0.16.1 torchaudio==2.1.1
pip install mlagents
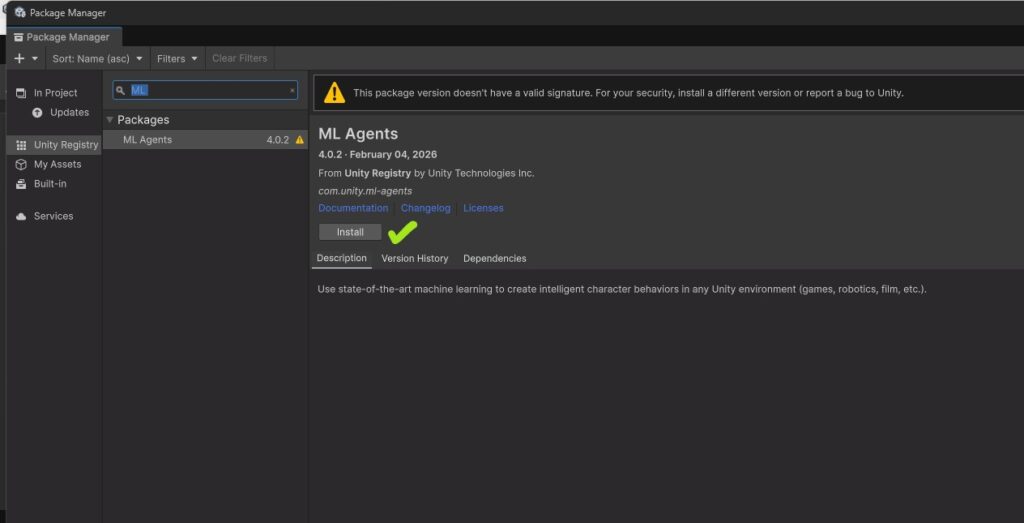
pip install onnx==1.15.0 protobuf==3.20.3Phase 2: Unity Package Setup
- Open your Unity project.
- Go to Window > Package Manager.
- Click the “+” button in the top left and select “Add package from Unity Registry”.
- Search for ML Agents and click Install.
Phase 3: Converting the C# Script to an ML-Agent
We need to rewrite your PaddleController code so the neural network can perceive the game, make decisions, and receive rewards.
Create a new script named PaddleAgent.cs and attach it to Player1. Remove the old PaddleController.
using UnityEngine;
using Unity.MLAgents;
using Unity.MLAgents.Actuators;
using Unity.MLAgents.Sensors;

public class PaddleAgent : Agent
{
    public float speed = 15f;
    public float yMax = 8.5f;
    public float yMin = -8.5f;

    [Header("Game References")]
    public Transform ball;
    private Rigidbody ballRb;
    public BallController ballController; // Reference to your existing ball script

    public override void Initialize()
    {
        ballRb = ball.GetComponent<Rigidbody>();
    }

    // Called at the start of every training episode
    public override void OnEpisodeBegin()
    {
        // Reset the paddle position
        transform.localPosition = new Vector3(-12f, 0, 0);

        // Reset the ball using your existing logic
        ballController.ResetBall();
    }

    // This is how the AI "sees" the game. We give it 5 numbers.
    public override void CollectObservations(VectorSensor sensor)
    {
        sensor.AddObservation(transform.localPosition.y); // Paddle's Y position (1)
        sensor.AddObservation(ball.localPosition.x);      // Ball's X position (1)
        sensor.AddObservation(ball.localPosition.y);      // Ball's Y position (1)
        sensor.AddObservation(ballRb.linearVelocity.x);   // Ball's X velocity (1)
        sensor.AddObservation(ballRb.linearVelocity.y);   // Ball's Y velocity (1)
    }

    // This is where the AI takes action based on its neural network
    public override void OnActionReceived(ActionBuffers actions)
    {
        int moveAction = actions.DiscreteActions[0];
        Vector3 move = Vector3.zero;

        // 0 = Stay, 1 = Up, 2 = Down
        if (moveAction == 1) move = Vector3.up;
        if (moveAction == 2) move = Vector3.down;

        transform.Translate(move * speed * Time.deltaTime);

        // Clamp the Y position
        Vector3 clampedPosition = transform.position;
        clampedPosition.y = Mathf.Clamp(clampedPosition.y, yMin, yMax);
        transform.position = clampedPosition;
    }

    // Allows you to manually test the agent using keyboard input before training
    public override void Heuristic(in ActionBuffers actionsOut)
    {
        var discreteActions = actionsOut.DiscreteActions;
        discreteActions[0] = 0; // Default stay

        if (Input.GetKey(KeyCode.W)) discreteActions[0] = 1;
        if (Input.GetKey(KeyCode.S)) discreteActions[0] = 2;
    }

    // Reward the AI for hitting the ball, punish it for missing
    private void OnCollisionEnter(Collision collision)
    {
        if (collision.gameObject.CompareTag("Ball"))
        {
            AddReward(1.0f); // Positive reinforcement!
        }
    }

    private void OnTriggerEnter(Collider other)
    {
        if (other.CompareTag("LeftGoal")) // Assuming the AI is Player 1 on the left
        {
            SetReward(-1.0f); // Negative reinforcement!
            EndEpisode();     // Restart the round
        }
    }
}
Phase 4: Configuring the Agent in the Inspector
- Select Player1 in the Hierarchy.
- In the
PaddleAgentcomponent, assign the Ball object and the BallController component to their respective slots. - Add a Behavior Parameters component to Player1:
- Behavior Name:
PaddleAI - Vector Observation > Space Size:
5(matches the 5 observations we collected). - Actions > Discrete Branches:
1 - Branch 0 Size:
3(Stay, Up, Down).
- Behavior Name:
- Add a Decision Requester component to Player1. Leave the Decision Period at
5(this means the AI makes a choice every 5 frames, which prevents jittering).
Phase 5: Training the Neural Network
- In your Unity project folder (where
Assetsis located), create a new file namedpaddle_config.yaml. - Paste the following configuration, which tells the Python backend how to optimize the network:
behaviors:
PaddleAI:
trainer_type: ppo
hyperparameters:
batch_size: 128
buffer_size: 2048
learning_rate: 0.0003
beta: 0.005
epsilon: 0.2
lambd: 0.95
num_epoch: 3
learning_rate_schedule: linear
network_settings:
normalize: false
hidden_units: 128
num_layers: 2
reward_signals:
extrinsic:
gamma: 0.99
strength: 1.0
max_steps: 1000000
time_horizon: 64
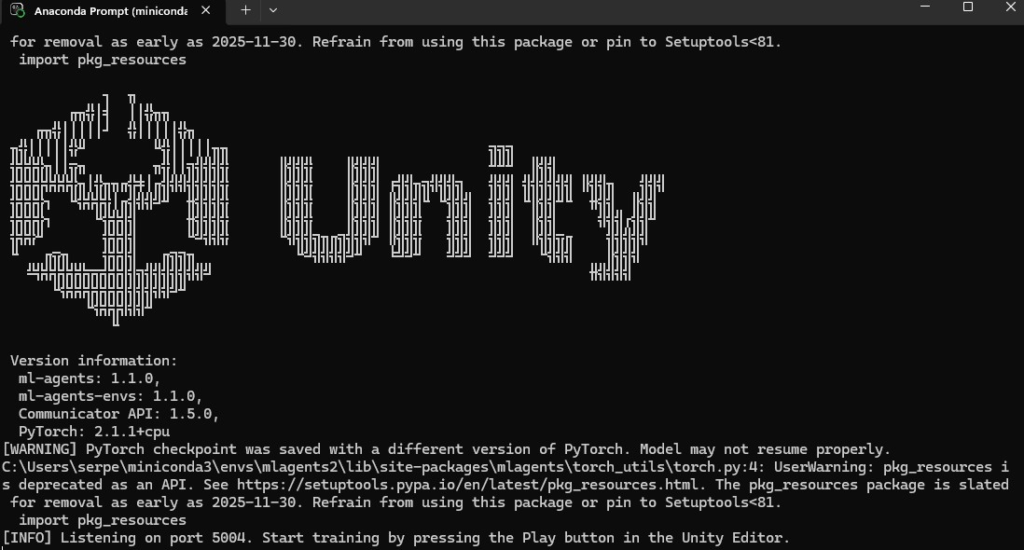
summary_freq: 10000Go back to your Anaconda Prompt, ensure your mlagents environment is active, and navigate to the directory containing your .yaml file.
Run the training command:
mlagents-learn paddle_config.yaml --run-id=Paddle_v1- The terminal will ask you to press Play in the Unity Editor. Go to Unity and press Play.
- You will see the paddle start acting erratically. Over thousands of episodes, the reinforcement learning algorithm will update the neural weights, and the paddle will learn to flawlessly track and hit the ball.
Phase 6: Injecting the “Brain”
Once training finishes (or if you stop it manually in the terminal by pressing Ctrl + C after the agent looks smart enough), ML-Agents will generate a neural network file.
- In your project folder, navigate to
results/Paddle_v1/PaddleAI.onnx. - Drag and drop this
.onnxfile into your UnityAssetsfolder. - Select Player1 in the Unity Hierarchy.
- In the Behavior Parameters component, drag your newly imported
.onnxfile into the Model slot. - Press Play in Unity. Python is no longer needed; your AI paddle is now running inference locally directly inside your game engine.
to resume your training run:
mlagents-learn paddle_config.yaml --run-id=Paddle_v1 --resume